Last Updated: November 4, 2026
Quick Summary
A seawall inspection checklist is a structured method for judging whether the wall holding back your shoreline is still doing its job. Inspect at least twice a year and after every tropical storm or hurricane, checking for cracks, rust staining, tilt, blocked weep holes, and soil erosion behind the wall. Document each finding with dated, scaled photos and compare against your baseline to catch movement early.
- Walk the full wall at low tide and photograph each finding with a scale reference.
- Tap the concrete with a hammer; a hollow sound signals delamination or voids.
- Check every weep hole, since a dry hole above the waterline means pressure is not relieving.
- Call a professional for cracks wide enough to insert a coin or visible soil loss.
- Walls over twenty years old or already showing movement need more frequent inspection.
Table of Contents
- Why a Seawall Inspection Checklist Protects Your Waterfront Property
- Visual Signs of a Failing Seawall
- The Full Seawall Inspection Checklist
- Seawall Repair Signs That Mean Call a Professional
- Seawall Maintenance Best Practices for Coastal Owners
- How to Choose a Seawall Contractor
- How Often Should You Inspect a Seawall?
- Request a Professional Marine Inspection Before You Buy or Repair
- Frequently Asked Questions
Why a Seawall Inspection Checklist Protects Your Waterfront Property
A waterfront property seawall inspection checklist is a structured, repeatable method for judging whether the wall holding back the shoreline is still doing its job. Walls fail slowly, then all at once.
Here is the core problem. A seawall rarely collapses without warning. It leans a little more each season, sheds a few more flakes of concrete, and lets a little more soil slip through the weep holes.
Below, we break the inspection into four stages: visual signs, structural checks, repair thresholds, and maintenance intervals. First, though, here is what most guides get wrong. They treat a cracked cap and a leaning wall as the same problem. They are not. One is cosmetic.
Visual Signs of a Failing Seawall
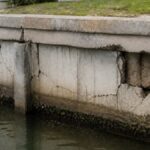
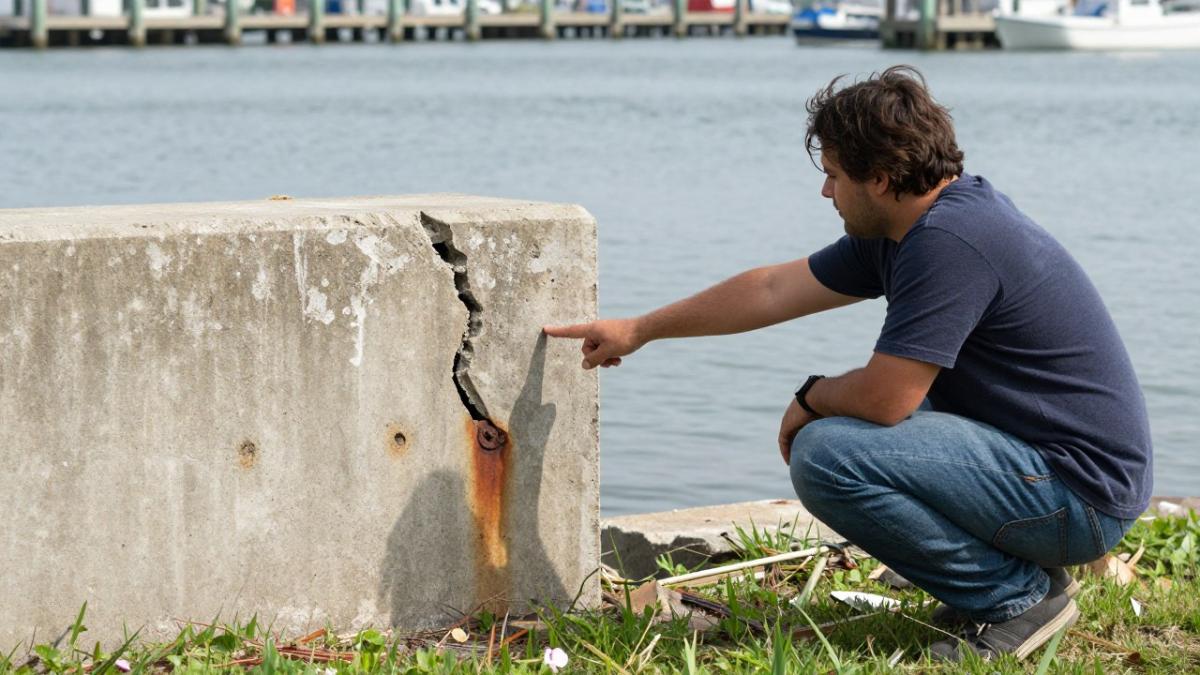
The most reliable early warning signs of a failing seawall are cracks that widen, concrete that flakes away, rust-colored staining, and a wall that no longer sits plumb.
Surface Cracks, Spalling, and Rust Staining
Spalling is the flaking and crumbling of concrete caused by moisture and corrosion of the steel inside it.
Rust staining is the tell. When you see brown streaks bleeding from a crack, the reinforcing steel inside is corroding and expanding, and that expansion is what pushes the concrete apart.
For a closer look at how coping fails and what replacement involves, read our seawall cap replacement guide.
Wall Alignment, Tilt, and Deflection
Stand at one end of the wall and sight down its length. A healthy seawall reads as a straight line.
The practical test: compare the wall to a fixed reference, such as a dock piling or a fence line. If the gap between them has changed since your last check, the wall is moving. Movement is the single most important finding in any seawall inspection.
The Full Seawall Inspection Checklist
Run this checklist periodically and after a named storm. Bring a hammer, a tape measure, a level, a notepad, and a phone for photos.
- Walk the full length of the wall at low tide, noting cracks, chips, and staining. Photograph each finding with something for scale (a coin, a tape measure, or your hand).
- Sight down the wall line from one end and photograph any bow, lean, or deflection against a fixed reference such as a dock piling or fence post.
- Tap the concrete with a hammer along the cap and at mid-height; a hollow sound signals delamination or voids behind the surface.
- Check every weep hole for free drainage or blockage. A dry weep hole above the waterline often means the wall is not relieving hydrostatic pressure.
- Inspect the soil behind the wall for depressions, soft spots, or sinkholes. Probe suspect areas with a soil probe or rebar.
- Look for exposed tiebacks, anchor rods, or deadman connections, and note any rust bleeding or pulled-forward soil in a line behind the wall.
- Check the cap for movement, separation from the wall, and missing sections. Measure any gap between cap and wall with a tape measure and record it.
- Photograph the waterline for scour and undercutting. Note the depth of any void under the wall toe using a marked rod.
- Confirm the wall material matches what was permitted and specified. Concrete, vinyl sheet piling, steel sheet piling, and timber each have different failure modes and inspection points.
- Note the date, tide, weather, and water level for each inspection, and file the photos in a dated folder.
- Compare photos and measurements against your baseline set from the previous visit, and record any change in crack width, lean, or scour depth.
Comparing against a dated baseline matters because memory is an unreliable record of gradual movement. Dated photos with a scale reference turn a vague impression into evidence you can hand to an inspector, an insurer, or a buyer’s agent.
Material Compliance and What to Look For by Wall Type
Concrete seawalls fail first at the cap and waterline, where salt spray and wet-dry cycling corrode the reinforcing steel. Vinyl sheet piling resists corrosion but can crack at the interlocks and deflect under sustained soil load. Steel sheet piling rusts through at the splash zone and needs periodic coating inspection. Timber walls rot at the mudline and at the cap connection.
Tiebacks, Deadman Anchors, and Load-Bearing Capacity
Tiebacks are steel rods or cables that anchor the wall back into stable soil, usually connected to a buried concrete block called a deadman anchor. Together they carry the load-bearing capacity that keeps soil pressure from pushing the wall into the water.
Signs of tieback trouble include a wall that leans consistently along one stretch, horizontal cracks at mid-height, and soil settling in a line behind the wall where an anchor has pulled forward. If you suspect anchor failure, our guide on seawall tieback systems explains how deadman anchors work and when reinforcement is needed.
Soil Erosion, Sinkholes, and Drainage Weep Holes
Weep holes are the small drainage openings in a seawall that relieve hydrostatic pressure by letting trapped water escape. When they clog, water builds up behind the wall and pushes outward. When they run freely, the wall is breathing the way it should.
Walk the ground behind the wall and look for sunken patches, soft turf, or small depressions. Those are signs of soil erosion washing through the wall from behind.
Seawall Repair Signs That Mean Call a Professional
Call a professional when you find any of the following: a wall leaning more than a slight amount, cracks wide enough to insert a coin, visible soil loss behind the wall, exposed or broken tiebacks, a cap that has separated from the wall, or scour that has undercut the wall toe.
The distinction between DIY observation and professional inspection is straightforward. Owners should inspect visually and document carefully. Owners should not diagnose structural capacity, pull on tiebacks, or attempt to judge whether a wall will survive the next hurricane season.
A practical threshold is this: if a finding changes between two inspections, or if a structural sign is visible from a distance, it is time for a professional evaluation. Cosmetic cap cracks that have not changed in years are a maintenance item. A crack that has widened, a lean that has increased, or soil that has settled in a new spot is a structural question.
What a Professional Evaluation Actually Includes
A marine inspection generally involves reviewing the wall’s lean and crack width against a baseline, probing the soil behind it, and checking tieback and anchor condition where accessible. The output should be a written report with dated photos, measurements, and a clear statement of what is cosmetic, what needs monitoring, and what needs repair. A written baseline also makes it easier to distinguish changes that warrant retaining wall repair from movement that can simply be monitored.
Documenting Findings for Insurance and Negotiation
This is where most guides stop, and it is where owners lose money. Photograph every finding with a scale reference and a date stamp, keep a log of inspection dates, tides, and weather, and save the professional report with your property records.
If you are seeing cracks, rust staining, or movement, seawall repair and reinforcement covers what a repair evaluation involves, including free inspections.
Seawall Maintenance Best Practices for Coastal Owners
Routine maintenance extends seawall life more than any single repair. Keep the wall clear of stored equipment and debris that trap moisture. Rinse salt spray from the cap periodically. Keep weep holes open. Maintain vegetation behind the wall so root systems and irrigation do not destabilize the soil.
Our seawall maintenance resources collect the recurring upkeep tasks, seasonal timing, and common questions in one place.
How to Choose a Seawall Contractor
Choose a contractor who is state-certified, insured, and willing to put scope and pricing in writing before work begins. Ask for the license number and verify it. Ask how change orders are handled.
Watch out: a quote that is dramatically lower than the others usually means the scope is missing something, often soil stabilization or anchor work. Compare what is included, not just the total.
How Often Should You Inspect a Seawall?
Inspect a seawall at least twice a year, plus after every tropical storm or hurricane. Walls over twenty years old, or walls that have already shown movement, should be inspected more often, and a professional structural evaluation should follow any storm that pushed water over the cap.
Consistency beats intensity. A brief inspection every six months, with dated photos, catches movement long before it becomes a repair bill.
Here is the inspection schedule the article recommends for coastal owners.
| Situation | Inspection frequency | Note |
|---|---|---|
| Standard seawall | At least twice a year | Plus after every tropical storm or hurricane |
| Walls over twenty years old | More often than twice a year | Also walls that have already shown movement |
| After a storm that pushed water over the cap | Professional structural evaluation | Follows the post-storm inspection |
| Routine check | Every six months with dated photos | Catches movement before it becomes a repair bill |
Request a Professional Marine Inspection Before You Buy or Repair
A professional marine inspection gives you a documented, independent assessment of the seawall, dock, and shoreline before you commit to a purchase or a repair. Crocker Marine Services offers marine inspections as part of its work across Southwest Florida, backs its seawall work with a 15-year seawall warranty and its True Price Guarantee, and is state-certified (CBC1266139) and fully insured.
If you are buying, our article on marine inspections before buying waterfront property explains what the process covers and how findings affect negotiations.
Frequently Asked Questions
What are the signs of a failing seawall?
Watch for surface cracks, spalling concrete, rust staining, and a wall that leans or has shifted out of alignment. Soil erosion behind the wall, sinkholes on the lawn, water seeping through the panels, and loose tiebacks are all red flags. Any combination of these points to a structural problem rather than cosmetic wear, and a professional seawall inspection should confirm whether repair or replacement is the right move.
How often should a seawall be inspected?
A visual walkover once or twice a year catches most problems early. Add a full professional structural evaluation every few years, and always schedule one after a named storm, a hurricane, or any visible change in the wall. Older walls past their expected service life, and walls in high-tidal or erosion-prone areas, benefit from annual professional checks. Consistent inspections are one of the core seawall maintenance best practices for protecting property value.
What does a professional seawall inspection include?
A marine inspector checks wall alignment and tilt, concrete condition, tieback and deadman anchor systems, drainage weep holes, and soil conditions behind the wall. The evaluation covers corrosion, load-bearing capacity, and shoreline stabilization, and it usually produces a baseline assessment with photos and a written summary. That documentation is valuable for real estate transactions, HOA records, and planning future repairs.
Can you repair a seawall or does it need replacement?
Many seawalls can be repaired when damage is caught early. Cracks, spalling, and localized erosion are often addressed with patching, drainage fixes, or added tiebacks. Replacement becomes the better option when the wall has lost significant structural integrity, is badly tilted, or the tieback system has failed across a long section. A professional inspection determines which path makes sense for your wall.
Why is a seawall inspection important before buying waterfront property?
A failing seawall can cost far more than buyers expect, and hidden problems may not show up in a standard home inspection. A marine inspection before closing gives you a baseline assessment of the wall’s condition, documents any defects, and supports negotiation or a repair credit. It protects your investment and helps you avoid surprise costs after you take ownership.
How do I choose a seawall contractor for repairs or replacement?
Verify the contractor is state-certified and insured, ask for proof of coverage, and ask which materials and standards they use. Request a written scope with clear pricing so you understand what is included, and ask how the company handles permits. A contractor who explains the inspection findings, offers a warranty, and provides references from similar waterfront projects is a safer choice than one quoting a vague number.
The shoreline in front of your property is not a fixed asset. It moves, settles, and wears, and the only question is whether you find out on your schedule or the storm’s. Get started with Crocker Marine Services and turn a visual walk-around into a documented, professional assessment before the next season arrives.